Prepare the fields
Give the form an email field, plus any name or custom fields you want in Benchmark Email.
Benchmark Email integration
Set up the Ninja Forms Benchmark Email integration with ClickSyncr for Benchmark Email. Choose a list in the form’s settings, map the contact data, and decide whether visitors must consent before the plugin sends anything.
A clear setup path
Keep the existing form and configure the destination beside the workflow you already use.
Give the form an email field, plus any name or custom fields you want in Benchmark Email.
Paste your Benchmark Email API key into the connection settings and connect.
Pick where new subscribers land in Benchmark Email: the list, group, form or audience you use.
Pair each form field with a Benchmark Email field. Email is required; the rest is optional.
Send a test entry, then find the new subscriber in Benchmark Email before you rely on the form.
Set up the Ninja Forms Benchmark Email integration with ClickSyncr for Benchmark Email. Choose a list in the form’s settings, map the contact data, and decide whether visitors must consent before the plugin sends anything.
Each form has its own connection and destination. These steps follow the plugin code checked on 10 November 2026.
You need WordPress, an active Ninja Forms installation, and permission to install and configure plugins. Have a Benchmark Email account and credentials for the platform your account uses. Classic keys and new-platform keys follow different connection paths. Prepare an email input and a consent checkbox if subscriptions require permission.
In WordPress, open Plugins > Add New. Search for ClickSyncr for Benchmark Email – Contact Form 7, WPForms, Gravity Forms, Ninja Forms, Fluent Forms, Formidable & Forminator. Choose Install Now, then Activate.
Edit the Ninja Forms form and open Emails & Actions. Add or open the action named ClickSyncr for Benchmark Email. Configure its account, list, and field mappings, then save the form. The action is the integration for this form, so review it when troubleshooting a missing contact.
For a classic account, open Benchmark Email, Integrations, API and copy the key. For a key beginning with bme_, open Benchmark Settings > API Keys. Copy both the key and its HTTPS API base URL. Enter that URL in API base URL; the current settings code requires contacts:write permission for this connection. Click Connect to verify and save the credential. Then select the Benchmark Email list that should receive this form’s submissions.
For a classic list, the mapping code includes FirstName, MiddleName, and LastName. It then reads the selected list’s named custom slots, Field1 through Field24, with text, number, boolean, or date types. A list’s actual labels determine which choices appear. New-platform accounts load field labels and requirements from the selected contact structure; map the required fields shown for that structure.
Ninja Forms mapping uses the form’s field keys and labels. Select the visitor’s email field explicitly. Optional values are matched through the action settings, so revisit the mapping if you replace a field instead of merely changing its visible label. Leave optional fields unmapped when the form does not collect that information.
Open Subscription and consent and choose the form’s Consent field when a visitor must opt in. A ticked choice allows the sync; an unticked choice sends nothing to Benchmark Email. Classic Benchmark lists apply their own subscription settings. The plugin does not choose a different confirmation rule for each classic subscription. With a new-platform key, the settings state that double opt-in is unavailable through that API. New contacts are Active, while existing inactive contacts stay inactive. Save the settings after choosing the behavior you need.
Test the published Ninja Forms form after saving its ClickSyncr action. Compare the submitted values with the contact in the selected list. Use a test contact you control and compare the mapped values in Benchmark Email. If you require consent, also submit once with the checkbox unticked. Confirm that the second submission does not add a contact. Check the sync result as well as the form’s confirmation.
“Nothing was sent. This form has no API key.” means this form still needs its credential. “not configured or email missing/invalid” points to the selected destination or email mapping. “Nothing was sent. Consent was not given.” records the unticked consent path; it is not a reason to remove the consent requirement.
“Benchmark returned a different list.” means the returned list does not match the selected list. Refresh the list choices and select the intended destination again. For a new-platform key, “Enter the HTTPS API base URL from Benchmark Settings > API Keys.” points to the required account-specific URL.
The Benchmark Email integration hub covers the service across builders. Use the Ninja Forms integration guide to compare destinations for this builder. For additional product options, review ClickSyncr Pro.
When a test entry reaches Benchmark Email with the right fields and consent, the Ninja Forms Benchmark Email integration is ready for real visitors.
Install ClickSyncr for Benchmark Email, then open Emails & Actions, in the ClickSyncr for Benchmark Email action. Connect the account for this form and select the list. Map Email before the optional fields, review consent, and save. Submit the public form and check Benchmark Email to confirm that the saved configuration sends the expected contact data.
For a classic list, the mapping code includes FirstName, MiddleName, and LastName. It then reads the selected list’s named custom slots, Field1 through Field24, with text, number, boolean, or date types. A list’s actual labels determine which choices appear. New-platform accounts load field labels and requirements from the selected contact structure; map the required fields shown for that structure. Recheck the saved mapping after changing the form or destination.
Yes. Select a supported consent field from this Ninja Forms form in Subscription and consent. When you choose that field, a ticked answer allows the sync and an unticked answer sends nothing to Benchmark Email. Save the form’s settings, then test both paths with distinct test contacts so you can tell the results apart.
The current code recognises a key beginning with bme_ and uses a separate connection path. It also requires the HTTPS API base URL from Benchmark Settings > API Keys. A key alone is not enough. Check that the credential has contacts:write permission, then connect and select the intended contact list before mapping its fields.
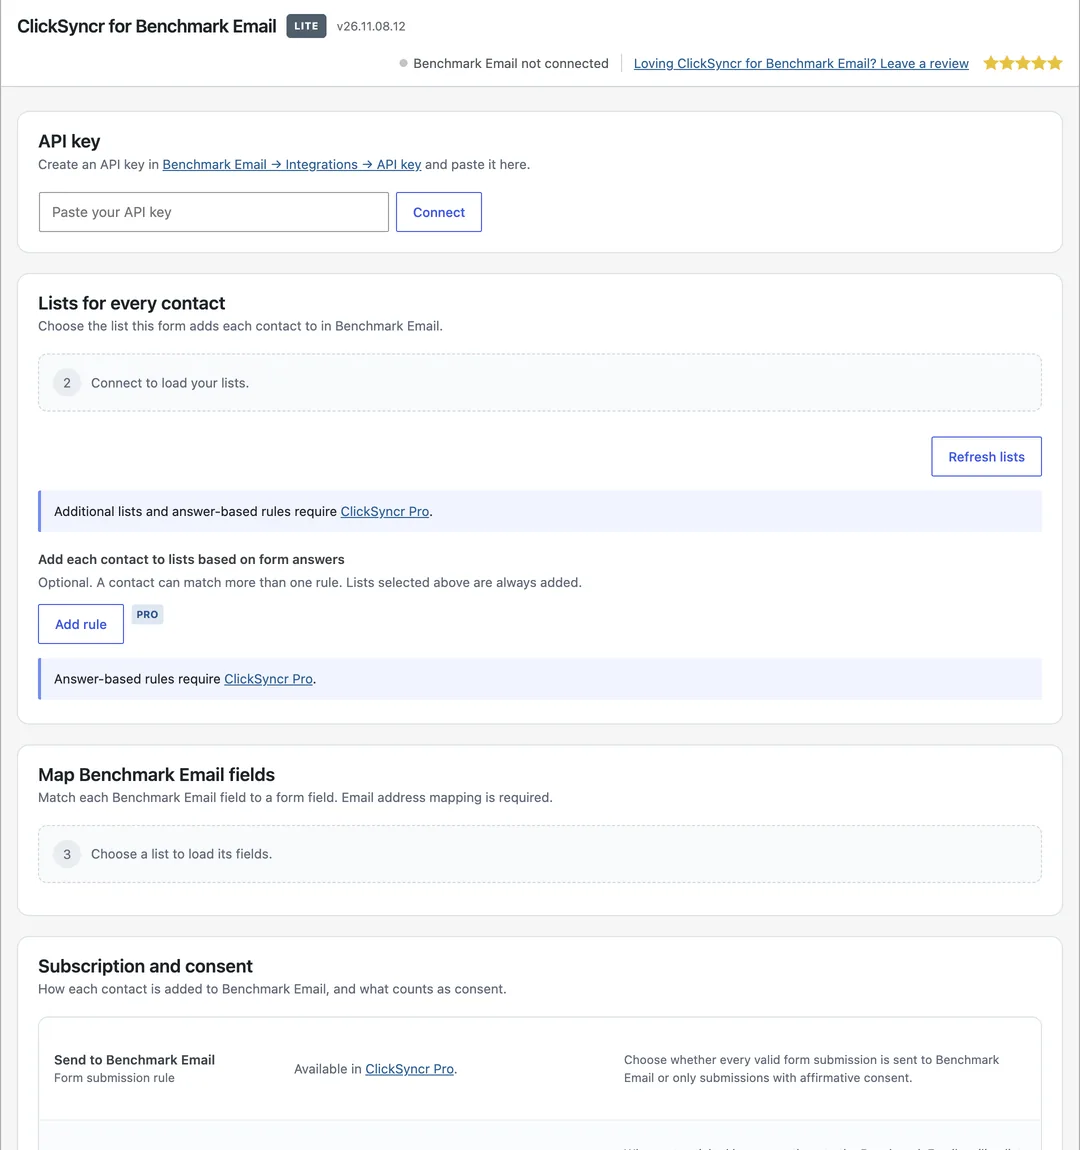
What you will see
The same panel appears inside every supported form builder, on each form you connect.
More guides
Connect Ninja Forms to Beehiiv and every form submission becomes a subscriber in the publication you choose.
View guideConnect Ninja Forms to Brevo and every form submission becomes a contact in the Brevo list you choose.
View guideConnect Ninja Forms to Campaign Monitor and every form submission becomes a subscriber in the Campaign Monitor list you choose.
View guideSet up the Ninja Forms Elastic Email integration with ClickSyncr for Elastic Email.
View guideConnect Ninja Forms to EmailOctopus and every form submission becomes a subscriber in the EmailOctopus list you choose.
View guideThe Ninja Forms GetResponse integration uses ClickSyncr for GetResponse to send each submission to a GetResponse list.
View guideConnect Ninja Forms to Kit, the email platform formerly known as ConvertKit, and every form submission becomes a subscriber in the…
View guideConnect Ninja Forms to Klaviyo and every form submission becomes a profile in the list you choose.
View guideConnect Ninja Forms to MailerLite with a form action.
View guideConnect Ninja Forms to Moosend and every form submission becomes a subscriber in the Moosend mailing list you choose.
View guideThe Ninja Forms SendPulse integration uses ClickSyncr for SendPulse to send each submission to a SendPulse address book.
View guideSet up the Ninja Forms Drip integration with ClickSyncr for Drip.
View guideThe Ninja Forms Loops integration uses ClickSyncr for Loops to send each submission to a Loops mailing list.
View guideYour next subscriber is one connection away
Install ClickSyncr, connect your platform, and publish your first tested sync in about two minutes.
Built by Renzo Johnson